Improve your Mey Interceptor with the shaft upgrade from UE3D
Experience maximum precision and stability with our innovative precision upgrade, specially developed for the Mey Interceptor. This improves the original folding mechanism and ensures a play-free, stable shooting experience. Thanks to the high-quality materials and well-thought-out construction, your crossbow becomes even more powerful - without compromising on weight or handling.
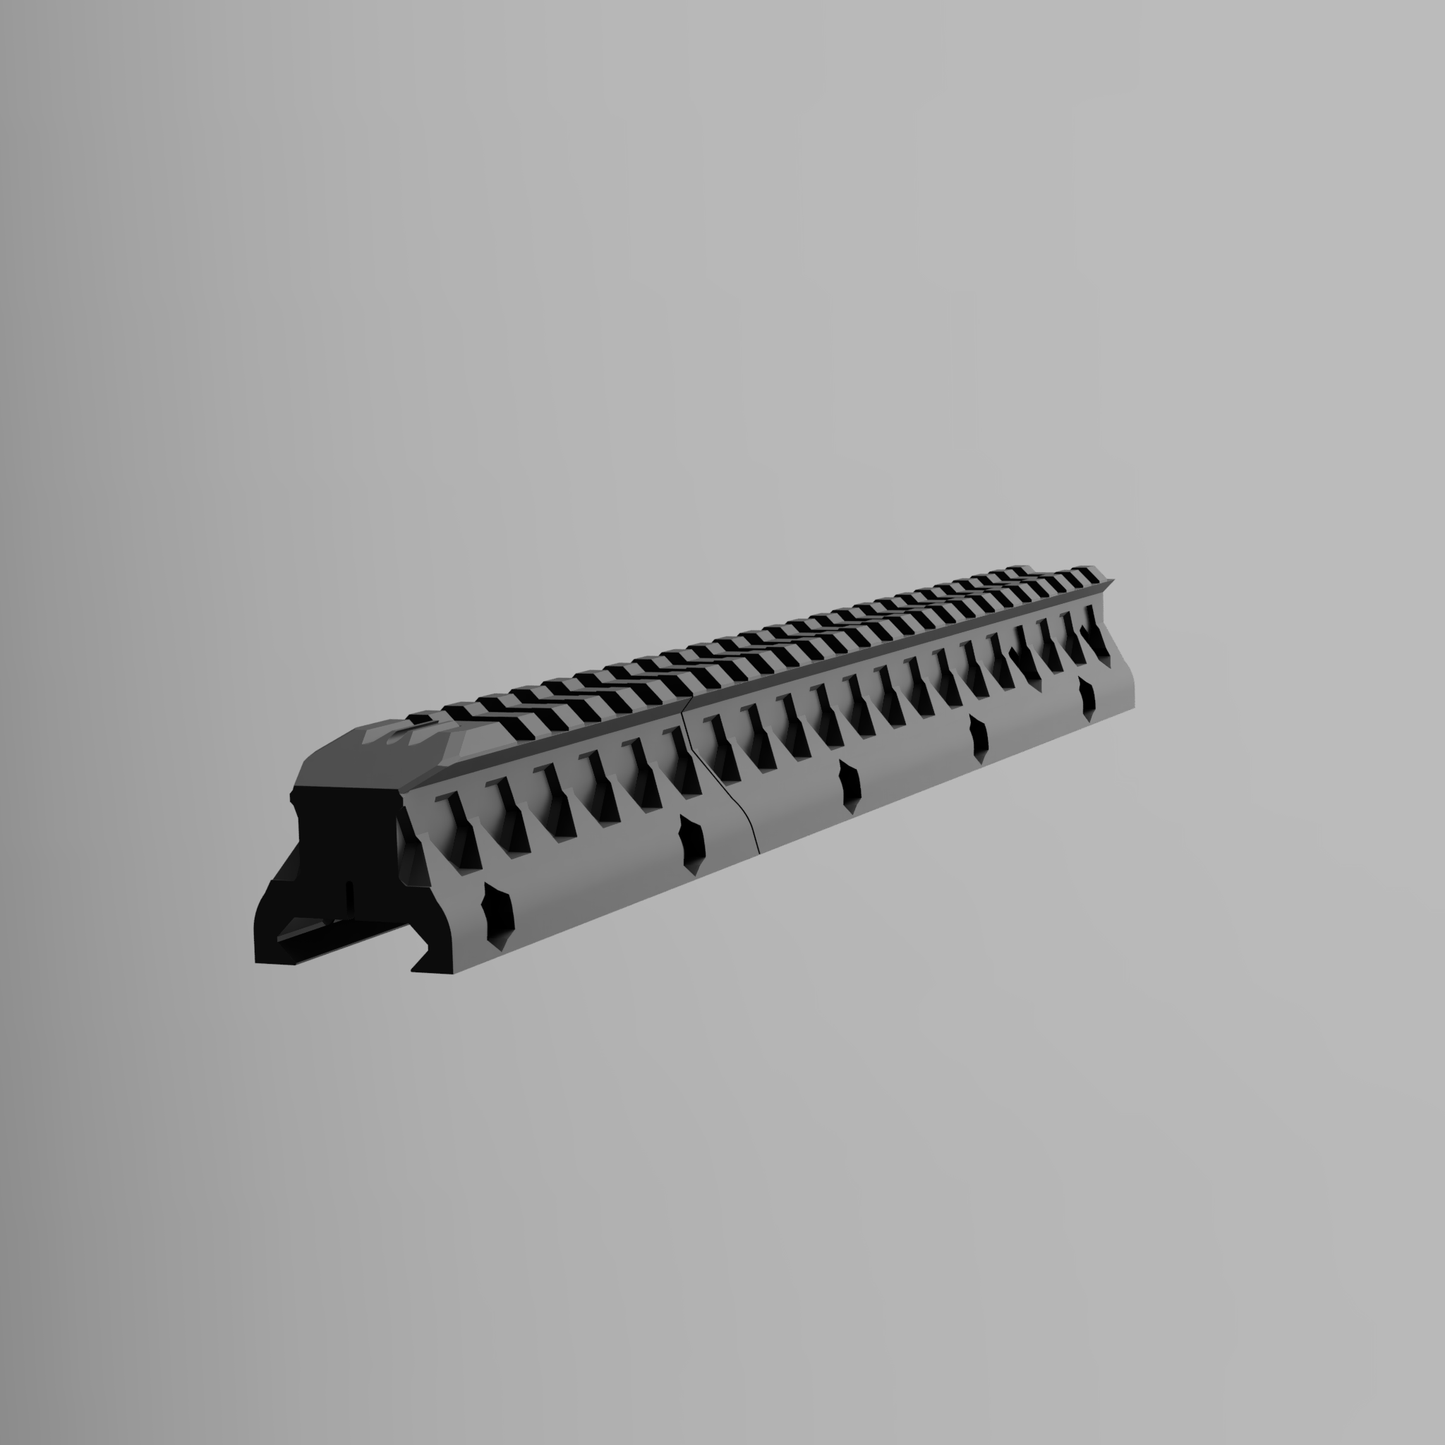
✨ Features and Benefits
-
Picatinny rail made of carbon fiber plastic
Function: Provides a rigid and durable base for accessories and ensures maximum stability.
Material: High-strength carbon fiber plastic for an optimal ratio of weight and stability.
-
stainless steel dowel pin
Function: Connects the Picatinny riser to the movable stock and minimizes any play. The play will never disappear 100%, only greatly reduced.
Advantage: Precise aiming with minimal lateral movement or instability.
-
Integrated passive aiming aid (light guide)
Function: The included light guide can be easily clamped at the front and serves as an effective aiming aid.
Additional information: If necessary, the light guide can be cut to the desired length with a sharp knife.
📦 Scope of delivery
Version V1:
- 2 x Picatinny rails made of carbon fiber plastic
- stainless steel dowel pin
- light guide (passive aiming aid, easy to insert and cut to size)
- M4x25 TX20 screws and nuts
- M4x12 TX20 screws and nuts
Version V2:
- 3 x Picatinny rails made of carbon fiber plastic
- stainless steel dowel pin
- light guide (passive aiming aid, easy to insert and cut to size)
- M4x25 TX20 screws and nuts
- M4x12 TX20 screws and nuts
Upgrade kit from V1 to V2
- 2 x Picatinny riser made of carbon fiber plastic (front part only. The rear piece and the other components are to be used from the V1)
Note: The play in the original state of the Mey Interceptor is not a defect, but due to the design. Our upgrade is an optional improvement for shooters who want to get the most out of their crossbow. With the upgrade kit from V1 to V2, there may be color and surface differences depending on suppliers and batches.
🛒 Now available
The stock upgrade has been fully developed, tested and is now available in our shop. Get the upgrade and make your Mey Interceptor even better! Perfect for shooters who value precision, stability and high-quality workmanship!
🛠️ Assembly instructions V1 (V2 is very similar)
Install the shaft upgrade
- Slide the short piece onto the rear Picatinny rail and lightly secure it with M4x25 screws, but do not tighten them completely yet.
- Slide the dowel pin (chamfered side must be facing out) into the long Picatinny rail and fix it lightly with M4x12 screws, but do not tighten them completely yet.
- Optional: Push the light guide into the long rail and, if necessary, cut it to the desired length with a sharp knife.
- Slide the long rail over the Picatinny and fix it with M4x25 screws, but do not tighten them yet.
- Close the crossbow and place it upright on its stock on a table (hold it with your left hand).
- Finally, tighten the short rail and the M4x25 screws by hand (remember: “too tight comes off”).
- With your right hand, press the long rail down as far as possible.
- Finally, tighten the M4x12 dowel pin screws by hand.
- Finally, tighten the M4x25 screws on the long rail by hand.
- Check if the wobble has been reduced. If necessary, tighten the screws a little more.
Instructions: Tendon replacement with the new splint
- Loosen and remove the front M4x25 screws.
- Completely loosen the third screw from the front.
- Pull out the Mey locking pin and slide out the carriage (other screws may need to be loosened).
- Follow the manufacturer's instructions for replacing the tendon.
- Reassemble everything in reverse order.
Note on fluid repetition
By clamping the original long Picatinny rail on the front side where the hook grips, it is slightly compressed by the clamping screw. This is because the manufacturer designed a recess that is too large at this point (in our opinion, much too large). As a result, any Picatinny mount - regardless of our rail - leads to a constriction at this point.
This narrowing means that the hook on the repeating stock no longer slides through the slot as easily and resistance is created, especially when opening. Unfortunately, this is due to the design and the manufacturer could have solved it better, for example by adding a stabilizing bridge over the slot.
However, we have found a quick and easy solution: With a file and about 5 minutes of work, the problem can be solved.
Proceed:
- File the top edge of the hook slightly diagonally on both sides.
- Always check to see if the hook is no longer getting caught.
- Repeat the process until the hook slides smoothly.
With this small adjustment, repeating becomes smooth again and without resistance.
New variant V2
We are pleased to announce that in addition to the proven V1 version, the new V2 version is now available. V2 offers additional benefits but does not replace V1. Both versions are available to suit different needs and preferences. V2 allows for even faster limb changes and offers improved handling, while V1 continues to be valued for its proven stability and precision.
Visit our shop to learn more about both versions and find the right upgrade for your Mey Interceptor!
This product is a 3D printed accessory designed exclusively for airsoft, archery and diving equipment. It is not a weapon, nor a weapon part or accessory for real weapons.